Bootstrap Tooltip Table

Intro
Sometimes, especially on the desktop it is a fantastic idea to have a suggestive callout together with a couple of hints appearing when the site visitor places the mouse pointer over an element. This way we are sure the correct info has been actually given at the proper time and hopefully greatly improved the visitor practical experience and convenience while utilizing our web pages. This behaviour is managed by the tooltip element that has a trendy and consistent to the entire framework styling look in the most recent Bootstrap 4 version and it's really simple to provide and set up them-- why don't we discover precisely how this gets done .
Aspects to notice while using the Bootstrap Tooltip Button:
- Bootstrap Tooltips depend on the Third party library Tether for setting . You ought to provide tether.min.js just before bootstrap.js so as for tooltips to work !
- Tooltips are opt-in for efficiency reasons, so you need to initialize them yourself.
- Bootstrap Tooltip Button along with zero-length titles are never presented.
- Indicate container: 'body' to keep away from rendering troubles in even more complicated
components (like input groups, button groups, etc).
- Activating tooltips on covert features will certainly not operate.
- Tooltips for .disabled or disabled features need to be set off on a wrapper element.
- Once set off from hyperlinks that span numerous lines, tooltips will be centralized. Employ white-space: nowrap; on your <a>-s to stay clear of this activity.
Got all of that? Excellent, why don't we see just how they work with several examples.
Exactly how to utilize the Bootstrap Tooltips:
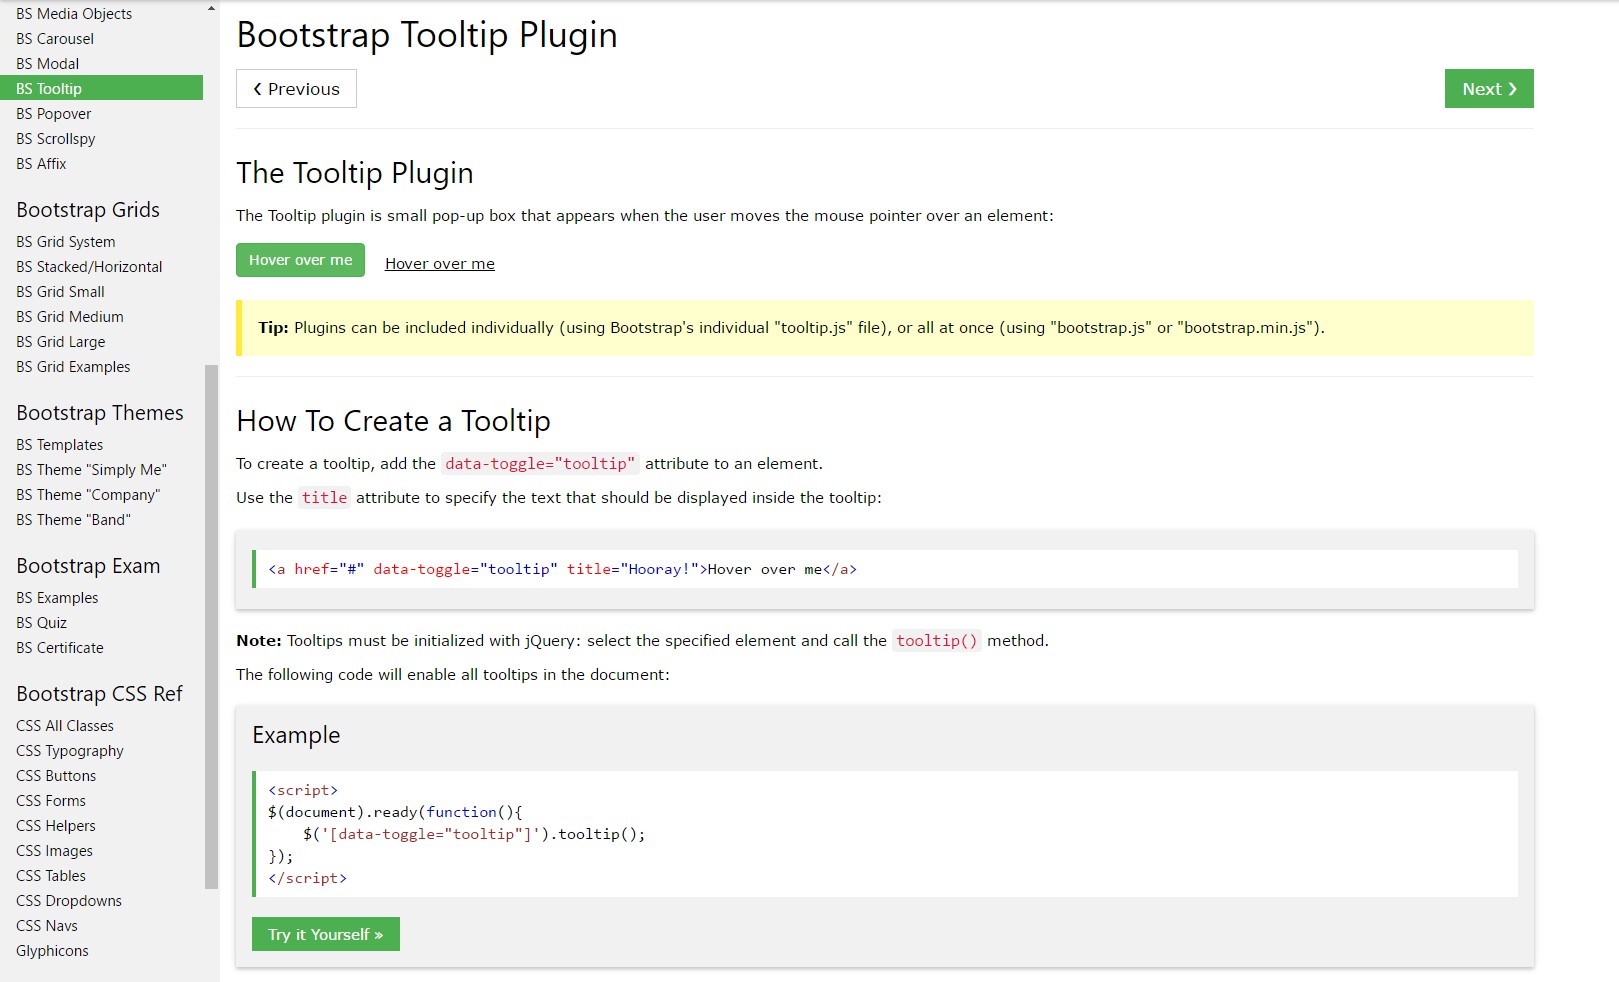
First of all to get use the tooltips functions we must enable it considering that in Bootstrap these elements are not permitted by default and need an initialization. To do this incorporate a basic <script> element somewhere in the end of the <body> tag making certain it has been set after the the call to JQuery library given that it uses it for the tooltip initialization. The <script> component needs to be wrapped around this initialization line of code $(function () $('[data-toggle="tooltip"]').tooltip()) which will activate the tooltips functionality.
What the tooltips in fact carry out is receiving what is generally within an element's title = ”” attribute and featuring it within a stylises pop-up element. Tooltips can possibly be used for a variety of components however are usually most practical for <a> and <button> components due to the fact that these are actually utilized for the site visitor's connection with the webpage and are a lot more likely to be requiring some explanations relating to what they really do if hovered using the computer mouse-- right before the ultimate clicking on them.
When you have activated the tooltips functionality just to assign a tooltip to an element you must bring in two mandatory and just one extra attributes to it. A "tool-tipped" elements need to possess title = “Some text here to get displayed in the tooltip” and data-toggle = “tooltip” attributes-- these are actually quite sufficient for the tooltip to work out surfacing over the intended component. Assuming that however you intend to specify the arrangement of the hint content relating to the element it concerns-- you can surely in addition do that in the Bootstrap 4 framework with the optional data-placement =” ~ possible values are – top, bottom, left, right ~ “ attribute which values just as quite self-explanatory. The data-placement default value is top and in the case that this attribute is simply omitted the tooltips appear over the defined element.
The tooltips appeal and activity has kept practically the exact same in both the Bootstrap 3 and 4 versions given that these certainly perform function quite properly-- practically nothing much more to become required from them.
For examples
One approach to activate all of the tooltips on a webpage would be to pick out them through their data-toggle attribute:
$(function ()
  $('[data-toggle="tooltip"]').tooltip()
)
Static Demo
Four approaches are readily available: top, right, bottom, and left adjusted.

Interactive
Hover above the switches beneath to view their tooltips.

<button type="button" class="btn btn-secondary" data-toggle="tooltip" data-placement="top" title="Tooltip on top">
  Tooltip on top
</button>
<button type="button" class="btn btn-secondary" data-toggle="tooltip" data-placement="right" title="Tooltip on right">
  Tooltip on right
</button>
<button type="button" class="btn btn-secondary" data-toggle="tooltip" data-placement="bottom" title="Tooltip on bottom">
  Tooltip on bottom
</button>
<button type="button" class="btn btn-secondary" data-toggle="tooltip" data-placement="left" title="Tooltip on left">
  Tooltip on left
</button>
And also with custom HTML added in:
<button type="button" class="btn btn-secondary" data-toggle="tooltip" data-html="true" title="<em>Tooltip</em> <u>with</u> <b>HTML</b>">
  Tooltip with HTML
</button>
Utilization
The tooltip plugin generates content and markup on demand, and by default places tooltips after their trigger element.
Cause the tooltip by using JavaScript:
$('#example').tooltip(options)Markup
The demanded markup for a tooltip is basically only a data attribute and title on the HTML component you wish to have a tooltip. The obtained markup of a tooltip is somewhat simple, while it does require a setting (by default, set to top by the plugin).
Having tooltips work with computer keyboard and assistive technology users.
You should only put in tooltips to HTML features that are definitely commonly keyboard-focusable and interactive (such as urls or form controls). Despite the fact that arbitrary HTML elements ( just like <span>-s) can be made focusable simply by providing the tabindex="0" attribute, this will add complex and most likely irritating tab stops on non-interactive components for key pad site visitors. Additionally, a large number of assistive technologies presently do not really declare the tooltip within this circumstance.
<!-- HTML to write -->
<a href="#" data-toggle="tooltip" title="Some tooltip text!">Hover over me</a>

<!-- Generated markup by the plugin -->
<div class="tooltip tooltip-top" role="tooltip">
  <div class="tooltip-arrow"></div>
  <div class="tooltip-inner">
    Some tooltip text!
  </div>
</div>
Features
Options may possibly be pass on through data attributes or else JavaScript. For data attributes, add the option name to data-, like inside data-animation="".
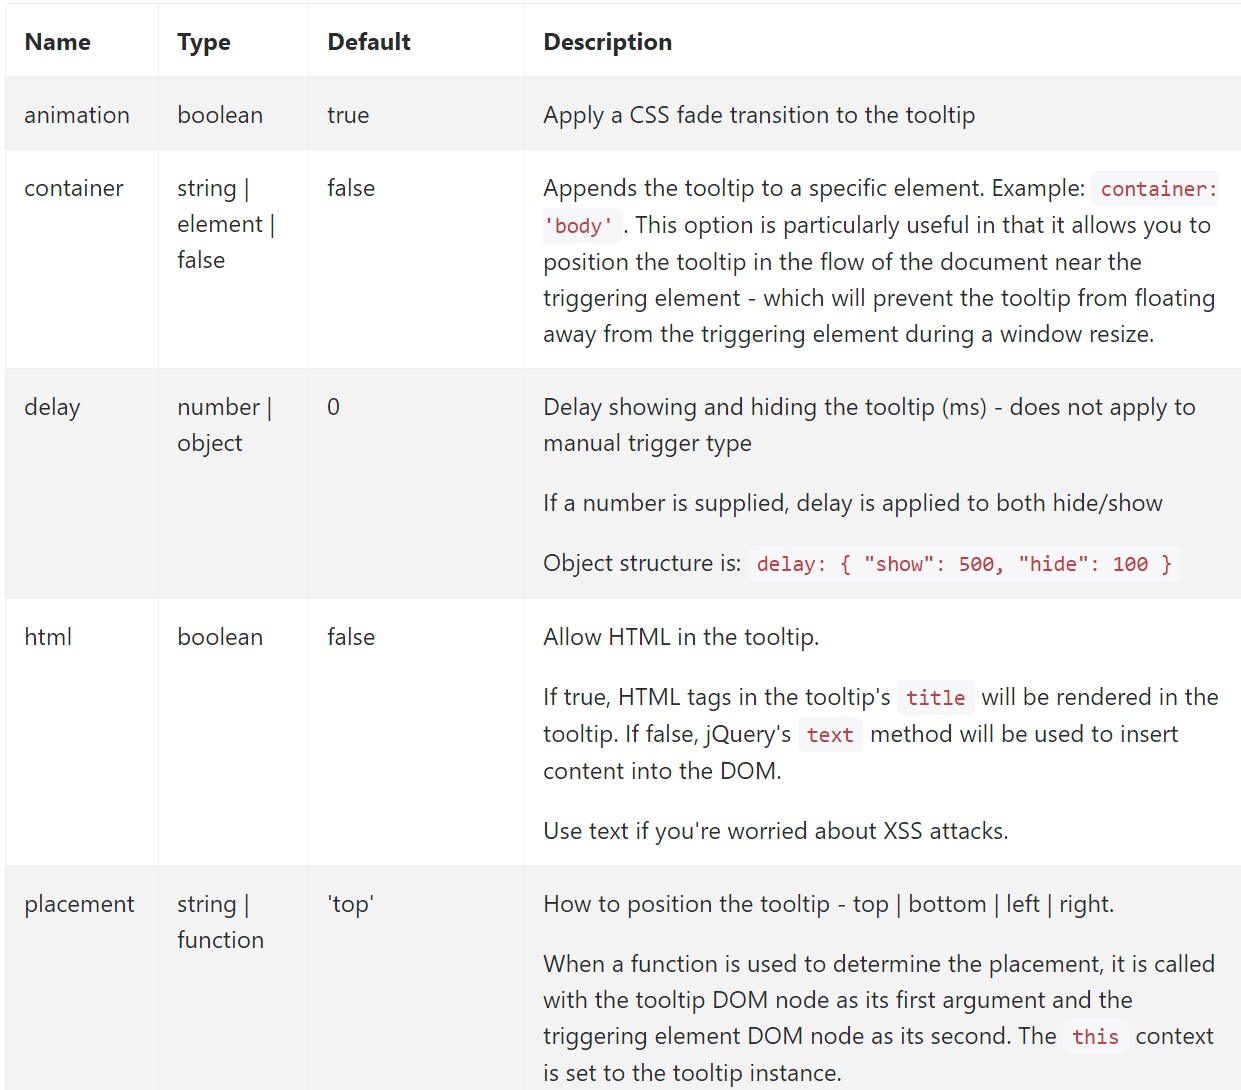
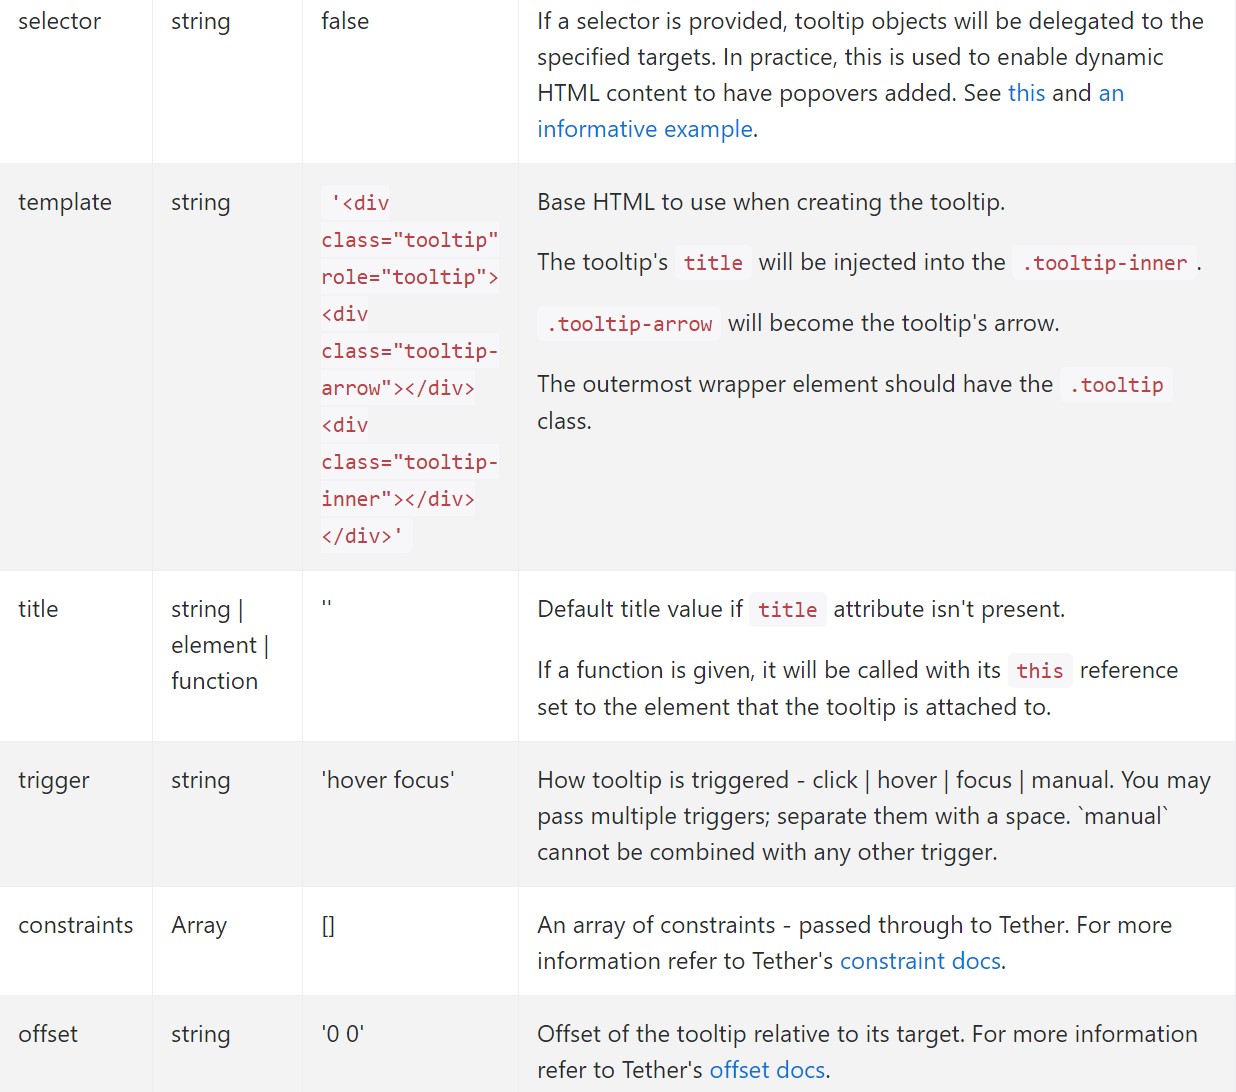
Data attributes for specific tooltips
Selections for special tooltips are able to additionally be indicated with the use of data attributes, just as clarified aforementioned.
Approaches
$().tooltip(options)
Attaches a tooltip handler to an element assortment.
.tooltip('show')
Exhibits an component's tooltip. Returns to the caller before the tooltip has in fact been displayed (i.e. just before the shown.bs.tooltip event happens). This is taken into account a "manual" triggering of the tooltip. Tooltips with zero-length titles are certainly never shown.
$('#element').tooltip('show').tooltip('hide')
Disguises an element's tooltip. Goes back to the customer before the tooltip has in fact been stashed ( such as just before the hidden.bs.tooltip occasion happens). This is regarded as a "manual" triggering of the tooltip.
$('#element').tooltip('hide').tooltip('toggle')
Toggles an element's tooltip. Returns to the customer right before the tooltip has actually been presented or else concealed ( such as just before the shown.bs.tooltip or hidden.bs.tooltip activity happens). This is considered a "manual" triggering of the tooltip.
$('#element').tooltip('toggle').tooltip('dispose')
Hides and removes an element's tooltip. Tooltips which employ delegation ( that are created working with the selector option) can not be independently eliminated on descendant trigger components.
$('#element').tooltip('dispose')Activities
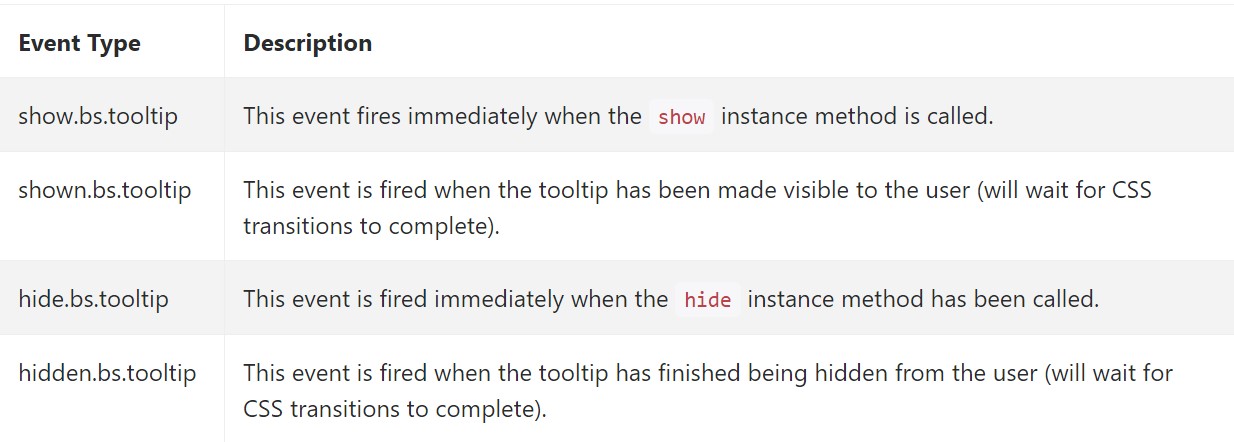
$('#myTooltip').on('hidden.bs.tooltip', function ()
  // do something…
)
Final thoughts
A thing to think of right here is the amount of details that goes to be positioned in the # attribute and eventually-- the placement of the tooltip according to the place of the major feature on a display screen. The tooltips really should be precisely this-- short meaningful guidelines-- placing excessive info might actually even confuse the website visitor as opposed to support getting around.
Also if the primary component is too near to an edge of the viewport positioning the tooltip alongside this very side might probably create the pop-up content to flow out of the viewport and the information within it to become basically inoperative. Therefore, when it concerns tooltips the balance in using them is essential.
Take a look at a couple of video clip tutorials about Bootstrap Tooltips:
Connected topics:
Bootstrap Tooltips authoritative information
Bootstrap Tooltips training
Change Bootstrap 4 Tooltip template without refresh