Bootstrap Menu Example

Overview
Even the easiest, not touching on the much more complicated pages do need some form of an index for the visitors to effortlessly get around and find exactly what they are looking for in the very first couple of secs avter their coming over the webpage. We need to regularly have in your mind a user might be in a hurry, searching a number of webpages quickly scrolling over them searching for a product or else choose. In such circumstances the obvious and well presented navigating list might bring in the difference among a single unique website visitor and the webpage being clicked away. So the construction and behavior of the web page navigating are necessary in fact. Moreover our websites get increasingly more viewed from mobile phone so not owning a webpage and a site navigation in special acting on smaller sreens nearly rises to not owning a web page in any way or even much worse.
Luckily the fresh 4th edition of the Bootstrap system provides us with a efficient instrument to handle the situation-- the so called navbar element or else the selection bar people got used noticing on the top of many webpages. It is a practical but efficient tool for covering our brand's identification data, the webpages structure or even a search form or else a handful of call to action buttons. Why don't we see exactly how this entire thing gets completed inside of Bootstrap 4.
Exactly how to make use of the Bootstrap Menu Tutorial:
Initially we want a <nav> component to cover the details up. It should likewise bring the .navbar class and also some designing classes designating it some of the predefined in Bootstrap 4 looks-- such as .navbar-light mixed with .bg-faded or bg-inverse with .navbar-inverse.
You can easily likewise use some of the contextual classes like .bg-primary, .bg-warning and so forth which all had the fresh edition of the framework.
One more bright new element introduced in the alpha 6 of Bootstrap 4 framework is you have to in addition appoint the breakpoint at which the navbar will collapse to get displayed once the selection button gets clicked. To do this include a .navbar-toggleable- ~the desired viewport size ~ to the <nav> element.
Next move
Next off we require to design the so called Menu switch which will come into view in the location of the collapsed Bootstrap Menu Dropdown and the users will use to carry it back on. To do this develop a <button> component along with the .navbar-toggler class and certain attributes, just like data-toggle =“collapse” and data-target =“ ~ the ID of the collapse element we will create below ~ ”. The default positioning of the navbar toggle button is left, and so if you prefer it right adjusted-- also apply the .navbar-toggler-right class-- as well a bright new Bootstrap 4 function.
Supported material
Navbars come up having incorporated assistance for a handful of sub-components. Pick from the following as demanded :
.navbar-brand for your company, product, or project brand.
.navbar-nav for a full-height and lightweight navigating ( featuring assistance for dropdowns).
.navbar-toggler application with Bootstrap collapse plugin and various other navigation toggling activities.
.form-inline for each form regulations and responses.
.navbar-text for including vertically based strings of words.
.collapse.navbar-collapse for organizing and hiding navbar components by means of a parent breakpoint.
Here's an instance of each of the sub-components included in a responsive light-themed navbar that immediately collapses at the md (medium) breakpoint.

<nav class="navbar navbar-toggleable-md navbar-light bg-faded">
<button class="navbar-toggler navbar-toggler-right" type="button" data-toggle="collapse" data-target="#navbarSupportedContent" aria-controls="navbarSupportedContent" aria-expanded="false" aria-label="Toggle navigation">
<span class="navbar-toggler-icon"></span>
</button>
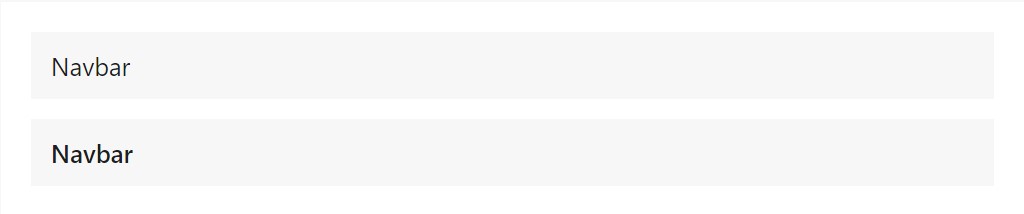
<a class="navbar-brand" href="#">Navbar</a>
<div class="collapse navbar-collapse" id="navbarSupportedContent">
<ul class="navbar-nav mr-auto">
<li class="nav-item active">
<a class="nav-link" href="#">Home <span class="sr-only">(current)</span></a>
</li>
<li class="nav-item">
<a class="nav-link" href="#">Link</a>
</li>
<li class="nav-item">
<a class="nav-link disabled" href="#">Disabled</a>
</li>
</ul>
<form class="form-inline my-2 my-lg-0">
<input class="form-control mr-sm-2" type="text" placeholder="Search">
<button class="btn btn-outline-success my-2 my-sm-0" type="submit">Search</button>
</form>
</div>
</nav>Brand
The .navbar-brand may be added to a large number of elements, but an anchor performs best considering that certain components might possibly require utility classes or else custom appearances.
<!-- As a link -->
<nav class="navbar navbar-light bg-faded">
  <a class="navbar-brand" href="#">Navbar</a>
</nav>

<!-- As a heading -->
<nav class="navbar navbar-light bg-faded">
  <h1 class="navbar-brand mb-0">Navbar</h1>
</nav>
Nav
Navbar site navigation urls build on Bootstrap .nav options along with their individual modifier class and need the application of toggler classes for appropriate responsive designing. Navigating in navbars are going to in addition develop to capture as much horizontal space as possible to keep your navbar information safely lined up.
Active states-- with .active-- to reveal the existing web page can be used directly to .nav-links or else their immediate parent .nav-items.

<nav class="navbar navbar-toggleable-md navbar-light bg-faded">
  <button class="navbar-toggler navbar-toggler-right" type="button" data-toggle="collapse" data-target="#navbarNav" aria-controls="navbarNav" aria-expanded="false" aria-label="Toggle navigation">
    <span class="navbar-toggler-icon"></span>
  </button>
  <a class="navbar-brand" href="#">Navbar</a>
  <div class="collapse navbar-collapse" id="navbarNav">
    <ul class="navbar-nav">
      <li class="nav-item active">
        <a class="nav-link" href="#">Home <span class="sr-only">(current)</span></a>
      </li>
      <li class="nav-item">
        <a class="nav-link" href="#">Features</a>
      </li>
      <li class="nav-item">
        <a class="nav-link" href="#">Pricing</a>
      </li>
      <li class="nav-item">
        <a class="nav-link disabled" href="#">Disabled</a>
      </li>
    </ul>
  </div>
</nav>
Forms
Put different form regulations and elements inside of a navbar by using .form-inline.

<nav class="navbar navbar-light bg-faded">
  <form class="form-inline">
    <input class="form-control mr-sm-2" type="text" placeholder="Search">
    <button class="btn btn-outline-success my-2 my-sm-0" type="submit">Search</button>
  </form>
</nav>
Text
Navbars may possibly include bits of content by using .navbar-text. This particular class sets vertical position and horizontal spacing for strings of message.

<nav class="navbar navbar-light bg-faded">
  <span class="navbar-text">
    Navbar text with an inline element
  </span>
</nav>
An additional function
One other brilliant fresh feature-- within the .navbar-toggler you ought to insert a <span> with the .navbar-toggler-icon to certainly create the icon inside it. You are able to also set an element having the .navbar-brand here and display a little bit regarding you and your business-- like its title and emblem. Additionally you might just decide wrapping the entire thing in to a web link.
Next we require to create the container for our menu-- it will extend it in a bar along with inline items above the defined breakpoint and collapse it in a mobile view below it. To perform this develop an element using the classes .collapse and .navbar-collapse. Assuming that you have looked at Bootstrap 3 and Bootstrap 4 up to alpha 5 classes structure you will probably notice the breakpoint has been specified just one time-- to the parent component however not to the .navbar-toggler and the .collapse element in itself. This is the brand new manner in which the navbar are going to be starting with Bootstrap 4 alpha 6 so bear in mind what edition you are currently employing in order to structure things properly.
Ultimate part
Lastly it is actually moment for the real site navigation menu-- wrap it in an <ul> element with the .navbar-nav class-- the .nav class is no longer needed. The certain menu pieces should be wrapped inside <li> elements holding the .nav-item class and the real links inside them ought to have .nav-link added.
Conclusions
And so basically this is certainly the structure a navigational Bootstrap Menu HTML in Bootstrap 4 have to hold -- it is certainly pretty practical and intuitive -- now all that's left for you is thinking out the appropriate building and eye-catching captions for your material.
Look at several youtube video tutorials regarding Bootstrap Menu
Related topics:
Bootstrap menu main documents

Mobirise Bootstrap menu
Bootstrap Menu on the right side
Free Bootstrap Responsive Menu Examples
HTML5 Bootstrap Accordion Menu Examples